| Version 11 (modified by , 14 years ago) ( diff ) |
|---|
Steps for setting up the WiMAX BTS on ORBIT
Please note: Do not restart BTS until all changes are complete. If you do happen to restart, you will have to use the serial interface to connect to the BTS.
Step1 Configuring the IP
We'll need to adjust the ip's of both interfaces. They're managed via two independent files which exists on two different machines/ip combos.
- The "DSP" machine:
- Copy the attached networkenv.orbit file locally (to your console) and edit it's addresses to reflect
your organisations Address Structure. If this is the first BTS in your organization
your address should be of the form 10.3.X.1, where X is the numerical ID given to your group. You'll only need to edit the #MACO segment of information.
You will also need to set the NAMESERVER flag to something reasonable like googles public DNS (8.8.8.8), or a specfic DNS in your network. Note that we're using
class B addresses.
#MAC0
export INTERFACE_0=eth0
export IPADDR_0=10.3.X.1
export NETMASK_0=255.255.0.0
export BROADCAST_0=10.3.255.255
export GATEWAY_0=10.3.X.1
export NAMESERVER_0=8.8.8.8
- Copy the file to /flash/networkenv on the DSP machine (via SCP). The default IP of the DSP machine is 192.168.1.10.
scp networkenv.orbit root@192.168.1.10:/flash/networkenv
- Copy the attached networkenv.orbit file locally (to your console) and edit it's addresses to reflect
your organisations Address Structure. If this is the first BTS in your organization
your address should be of the form 10.3.X.1, where X is the numerical ID given to your group. You'll only need to edit the #MACO segment of information.
You will also need to set the NAMESERVER flag to something reasonable like googles public DNS (8.8.8.8), or a specfic DNS in your network. Note that we're using
class B addresses.
- The "Network" Machine
- Telnet to the N/W card at 192.168.1.42/24. User root as the username, you will not be asked for a password.
- Edit the /etc/network/interfaces eth1 entry to organisations Address Structure. It should be of the form 10.3.X.2, for the first BTS. The entry should look
similar to:
auto eth1
iface eth1 inet static
address 10.3.X.2
network 10.3.0.0
netmask 255.255.0.0
broadcast 10.3.255.255
gateway 10.3.X.1
- Finally you'll need to configure your own interface to be in the same subnet as the BS Ip's. For the first BS it should be of the form 10.3.X.254.
Step 2 Configure The BS software
- ssh to the new IP of the DSP machine. ssh root@10.3.x.1
- Use wiset commands below to correct configuration on the BTS:
- Enter these Verbatim
wiset authgw_id 0x41534E47
wiset authgw_port 0x08B7
wiset asngw_id 0x41534E4757303030
wiset asngw_dp_port  0x08B7
wiset asngw_ep_port 0x08B7
wiset bs_rx_port 0x08B7
wiset frequency  2551500
wiset bs_tx_power 40
wiset bw_mode 0
wiset dlul_ratio 2
wiset ttg 296
wiset rtg 168
wiset framesync_mode 2
wiset antenna_gain 0
- These commands require you to change the IP paramter specfied in hex. The IP should that of the console's eth1 interface (which speaks to the BTS).
wiset authgw_ip 0x0A030047
wiset asngw_dp_ip 0x0A030047
wiset asngw_ep_ip 0x0A030047
- You will find your bsid (OID) on this page. Note remove the colons, and set the last two digits to
reflect the IP of the DSP machine (e.g. the first one should be 01).
wiset bsid 0x303030303030
- Enter these Verbatim
After this process, the BS will require a reboot.
This site converts dot quad to hex.
Attachments (3)
-
networkenv.orbit
(301 bytes
) - added by 14 years ago.
Netwokr configuration file for sector card
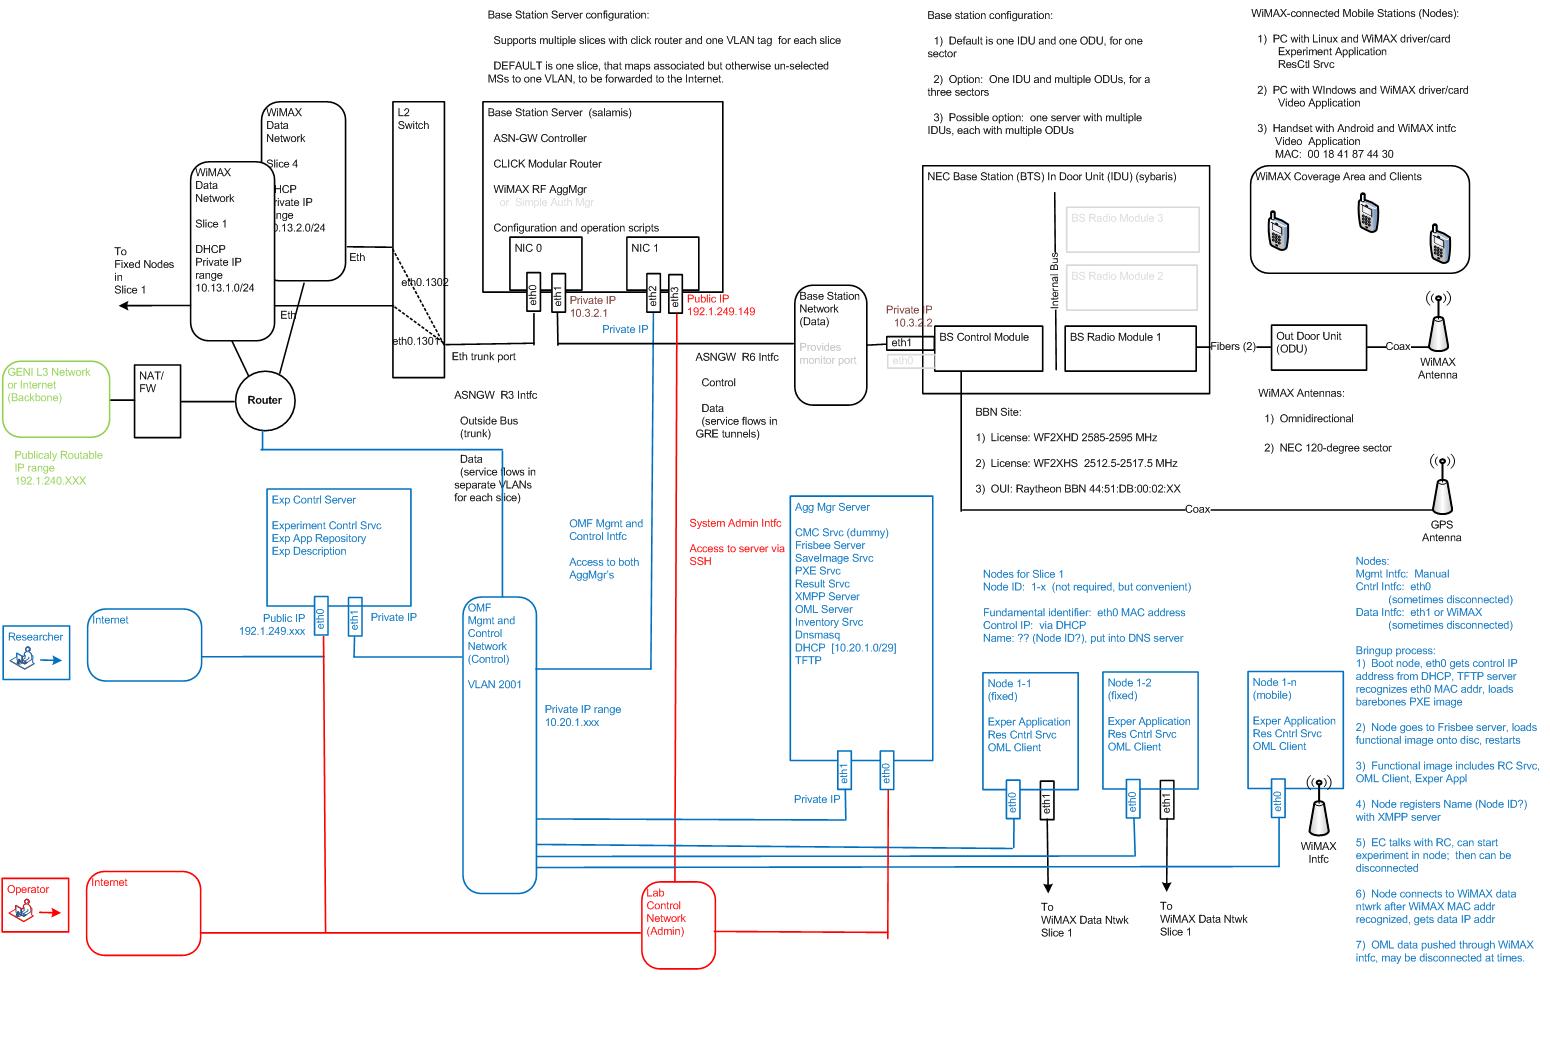
- WiMAXSystemOverview.vsd (3.3 MB ) - added by 14 years ago.
- wimax_system.JPG (190.9 KB ) - added by 14 years ago.
Note:
See TracWiki
for help on using the wiki.