| Version 15 (modified by , 12 years ago) ( diff ) |
|---|
13. Wimax Measurement Application: wimax_gps_oml2
Description
Collects Wimax radio link parameters with corresponding GPS coordinates on the client and sends to OML server. The following parameters are recorded and sent to the OML server: Center frequency, RSSI, CINR, Transmit power, Time from GPS, Latidute, Longitude, Altitude.
Everything described below must be running on a mobile client with an Intel 5150 WiMax Network Card.
Software Requirements
- wimaxcu : Wimax radio utility. Must be installed on machine to operate wimax radio.
- oml2-server: OML measurement collection server. Note: this server may be locally installed on the mobile.
- gpsd: GPS service daemon running locally. Information on gpsd can be found on http://gpsd.berlios.de/
- wimax_gps_oml2: Wimax measurement application. The application's source code is available at wimax_client/trunk. To compile from the source, use the makefile or enter the following:
gcc -loml2 -lgps wimax_gps_oml2_main.c libiWmxSdk.so lwimaxcu.a -o wimax_gps_oml2
Hardware Requirements
- GPS receiver: for example a Garmin USB Receiver - model#: GPS18x-5Hz. Other compatible GPS models can be found on http://gpsd.berlios.de/hardware.html
Installation / setup procedures
- Edit the /etc/apt/sources.list and add the following line:
deb http://packages.orbit-lab.org/ubuntu jaunty main
deb http://pkg.mytestbed.net/ubuntu maverick/
- Update information based on the changed sources.list.
sudo apt-get update
- Install the wimaxcu utility if not already installed, then reboot the machine
sudo apt-get install wimaxcu-1.0
reboot
- Run the following commands to start wimax daemon service, and operate wimax radio
wimaxd -i wmx0 -b

wimaxcu ron
wimaxcu scan
wimaxcu connect network 51
- Install the Wimax measurement application (wimax_gps_oml2) and the GPS Daemon (gpsd)
sudo apt-get install wimax-gps-oml2
- If measurements are to be collected locally install the oml2-server otherwise this step may be skipped.
sudo apt-get install oml2-server
Note: The default settings for the OML server are stored in /etc/default/oml2-server. By default the database files are saved in /tmp directory which is purged after every reboot. To change this default directory, edit the —data-dir flag to point to some other directory and then restart the oml server.
- Attach GPS receiver to mobile. At this point please refer to http://gpsd.berlios.de/troubleshooting.html and verify that GPS is able to send data and also able to talk to gpsd.
Usage
- Refer to http://gpsd.berlios.de/troubleshooting.html and verify the GPS receiver is able to send data and also able to talk to gpsd.
- Verify oml2-server is running
ps -elf | grep oml2-server
If needed restart oml2-server:
/etc/init.d/oml2-server restart
- Verify gpsd is running
ps -elf | grep gpsd
If needed start gpsd as a daemon with the following command. Note: /dev/tty* name may be different. Refer to gpsd troubleshooting to find correct /dev/tty* name.
gpsd /var/run.gpsd.sock /dev/ttyUSB0
- Run wimax_gps_oml2 collection application.
./wimax_gps_oml2 --oml-id 4 --oml-exp-id exp4 --oml-server localhost:3003
This will create an sqlite database file (exp4.sq3) on the oml server.
Troubleshooting GPS Service Daemon
Please refer to troubleshooting gpsd please refer to http://gpsd.berlios.de/troubleshooting.html.
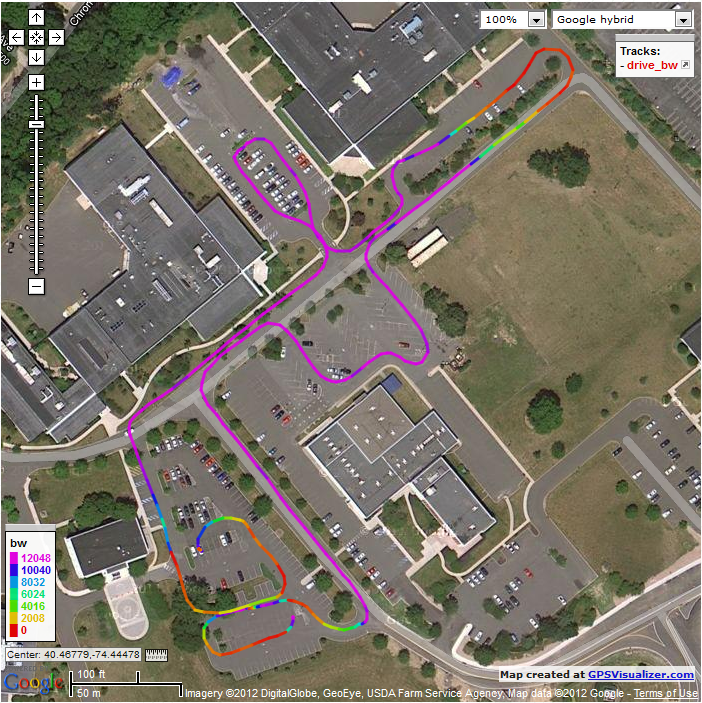
Sample data
Here's are the snapshots of drive data collected around the Wimax BS at Rugters Winlab.

RSSI 
CINR


Post processing data
After the application is run, it'll create an sql file on the oml server. Processing this file to extract the measured data can be done in several ways. The steps outlined here can be used to generate the image shown above.
- Process the sql file into delimited ascii text.
sqlite3 exp4.sq3 "select * from wimax_measurements;" > exp4.dat
- Extract the rssi field from delimited ascii text file. This was done via awk script: rss.awk
awk -f rssi.awk exp4.dat > exp4_rssi.dat
- Use gpsvisualizer to plot exp4_rssi.dat.
- Under Upload your GPS data files for File #1 select exp4_rssi.dat.
- Under Track options for Colorize by select custom field from the pull down. Once the Custom colorization field appears enter rssi.
- Finally click Draw the map
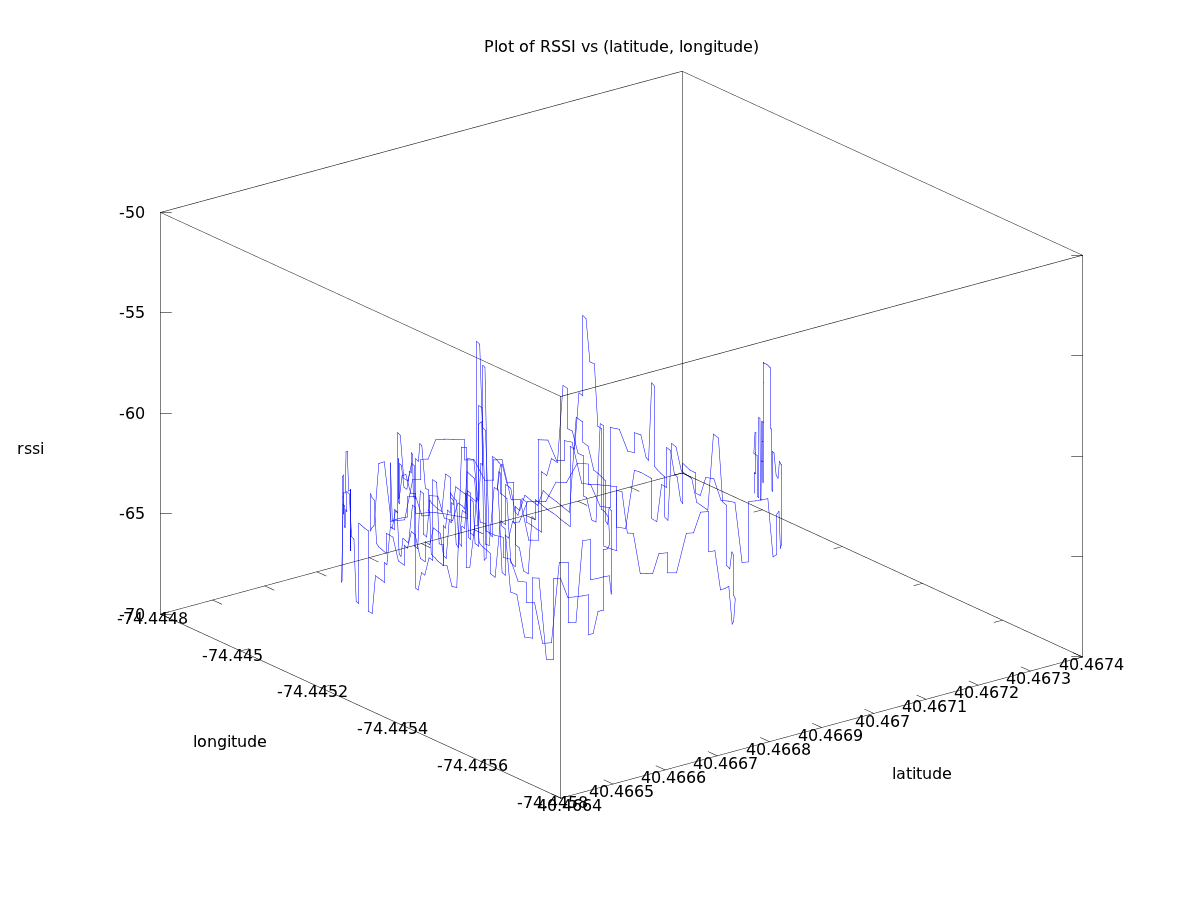
Alternatively, OCTAVE or MATLAB can be used to process the data. The Octave script plot3d.m was used to plot the RSSI in 3D from the datafile: exp5_rssi_oct.dat. The following is a rudimentary 3D plot of the RSSI in front of Rutgers Winlab.
| 3D RSSI Plot |

|
Attachments (9)
-
rss.awk
(277 bytes
) - added by 13 years ago.
RSSI extraction AWK script
-
gps_drive_cinr.png
(704.2 KB
) - added by 13 years ago.
Resulting CINR trace in GoogleEarth
-
gps_drive_rssi.png
(516.3 KB
) - added by 13 years ago.
Resulting RSSI trace in GoogleEarth
-
exp5_rssi_oct.dat
(48.9 KB
) - added by 13 years ago.
Experimental drive data used to generate 3D RSSI plot.
-
plot3d.m
(160 bytes
) - added by 13 years ago.
Octave (MATLAB) script to generate 3D RSSI plot.
-
rssi3D.png
(93.3 KB
) - added by 13 years ago.
3D RSSI plot.
- gps_drive_tp.PNG (1.2 MB ) - added by 12 years ago.
- gps_drive_tp.sq3 (56.0 KB ) - added by 12 years ago.
- gps_drive_tp.csv (36.1 KB ) - added by 12 years ago.