| Version 21 (modified by , 9 years ago) ( diff ) |
|---|
GENI Site Installation
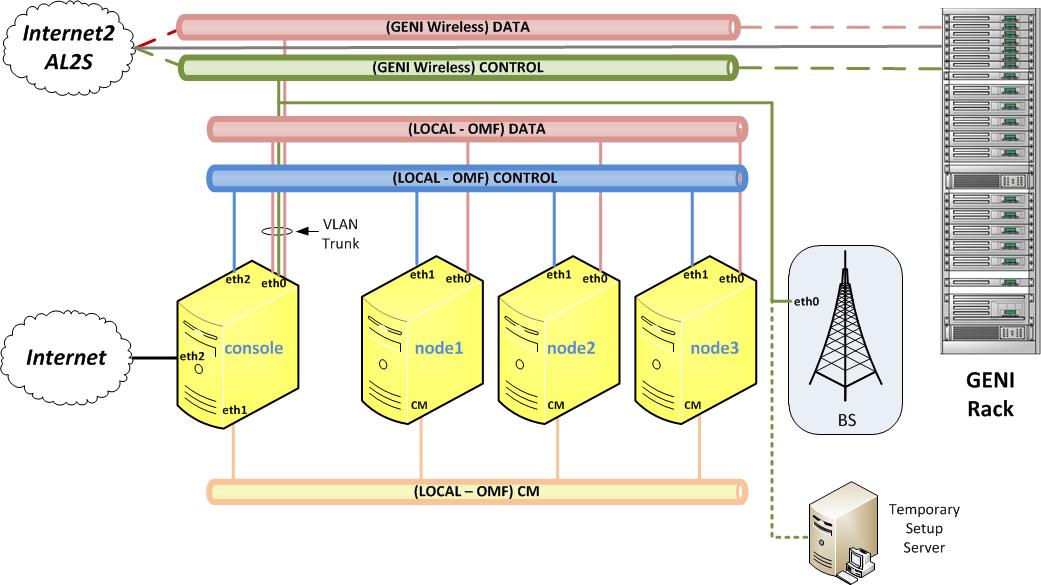
Depending on the number of site basestations , standard GENI 4G wireless deployment typically belongs to one of the two configurations: 1) single-BS site with OMF services on the (yellow) console node as shown in Figure 1, and 2) multi-BS site with dedicated BS controller(s) as shown in Figure 2. The OMF part of the setup consists of a console and 3 (yellow) nodes. The nodes can be easily distinguished from the console by the number of Ethernet ports they have. Consoles require 4 ports while nodes have only 3. The console node acts as an authenticated gateway, that only allows registered authenticated users to login to client node resources. Each site might also require temporary setup server (that is used for initial basestation configuration); optionally, sites can chose to use global (GENI wide) installation/configuration server (requires GENI Control subnet).
Single BS Site
 node")
Figure 1: Typical Single Basestation Setup
In this configuration all of the OMF/BS services are running on the console which also has access to all subnets.
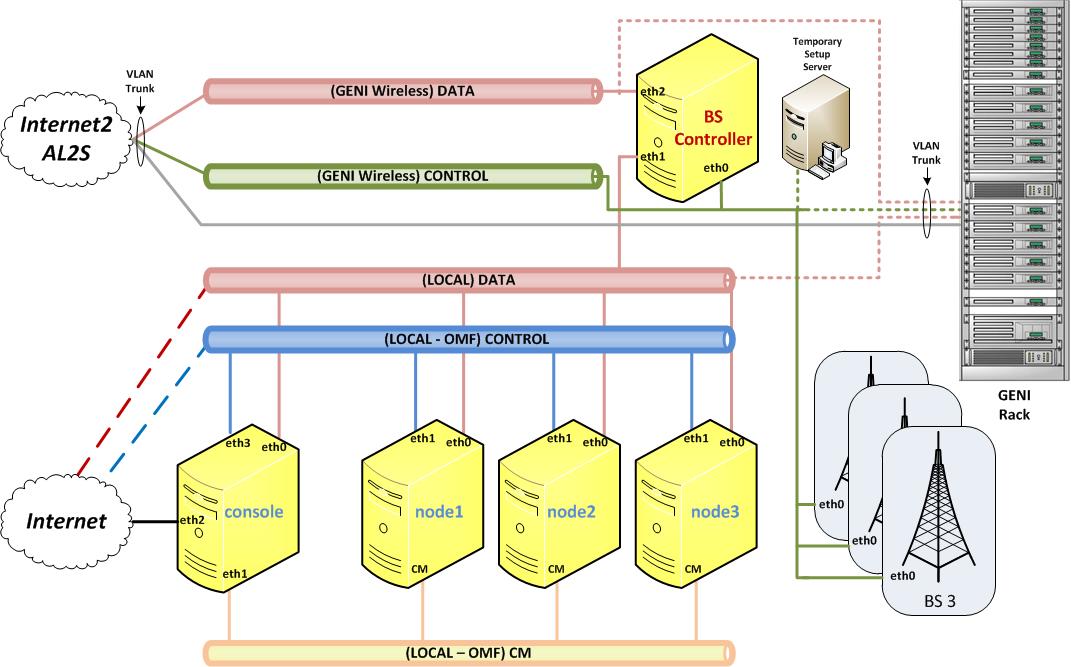
Multiple Basestations Site
 controller")
Figure 2: Typical Multi-Basestation Setup
In this configuration due to performance requirements of multi-BS management. dedicated server(s) are used for basestation management. Typically, other OMF services are running on the console (sites with large number on nodes can decide to further split OMF services among multiple servers). Typically, only BS controller(s) have access to global VLANs.
Networking Configurations
The different networks for the GENI Wireless site are:
- Local CM - admin management of nodes, power cycle them remotely, access console etc.
- Local Control - experimenters issue commands over this network
- Local Data - actual interface that allows client nodes unrestricted communications and is under full control of the experimenter. It is used by both fixed Ethernet interfaces (eth0) on the nodes as well as by the wireless clients on the nodes (through the basestation).
- GENI Wireless Data - dedicated GENI-wide subnet that, through multi-point AL2S, connects all wireless sites into single L2 broadcast domain end enables large scale experimentation.
- GENI Wireless Control - another multi-point AL2S subnet that is used for global BS management/control (netspan, asn-gw and ePC).


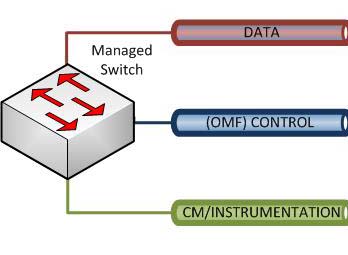
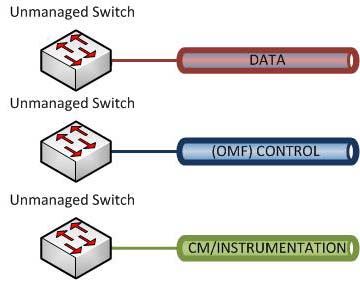
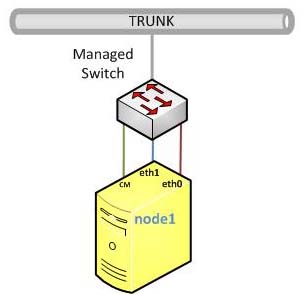
Figure 3: Possible (Local) Network Switch Configurations
The 3 OMF related networks can be setup in various ways. The three recommended ways for GENI sites are as follows (Figure 3):
- Single managed switch per site with different networks setup for all nodes via trunk VLANs for the entire local/campus path. This is the recommended configuration that implies three wires to each of the nodes.
- Single (low port count) managed switch per node with all networks trunk-ed to a upstream campus switch (this configuration is appropriate if there are issues with running multiple wires to the node location but requires uniformed VLAN assignment across campus network).
- Single unmanaged switch per subnet setup: each of the 3 local paths has a separate switch (please note that this configuration does not support connections for the 2 global GENI paths to the console node and are here only for reference).
In all configurations, external access is assumed to be through Console node. The three local subnets can either reach the public internet via the Console gateway or directly (in which case fire-walling the subnets is strongly recommended); resources in GENI are accessible to the console or BS controller server directly via Layer 2 VLANs.
Installation
The site software installation process has three major phases. All of the software setup is done on the console since the nodes have their operating system pushed onto them via the OMF imaging infrastructure (that we are going to build on the console). To setup the console software, we have to: 1.) install a base operating system (based on Ubuntu 12.04/14.04), 2.)install the omf services and 3.) configure the installed OS srevices and OMF services and test the deployment. The services that need to be configured are: DNS/DHCP, LDAP, xmpp and a range of OMF Aggregate Managers: Inventory, Account Management, CMC, etc. Last step in the installation process is to connect the site to GENI backbone and enable GENI portal based access.
Attachments (5)
-
SWa.jpg
(30.2 KB
) - added by 10 years ago.
Switch Configuration A
-
SWb.jpg
(35.3 KB
) - added by 10 years ago.
Switch Configuration B
-
SWc.jpg
(31.8 KB
) - added by 10 years ago.
Switch Configuration C
-
GENI Setup - big.jpg
(92.9 KB
) - added by 9 years ago.
GENI site with dedicated basestation (BS) controller
-
GENI Setup - simple.jpg
(80.7 KB
) - added by 9 years ago.
Simple GENI setup with single Resource Manager (RM) node
Download all attachments as: .zip