| Version 8 (modified by , 10 years ago) ( diff ) |
|---|
Samsung Galaxy S2
Table of Contents
Virgin Mobile
Root Method
Basic instructions with build GB28 (should work with all other builds if they have the proper files). For conveniency, all files needed during the process can be downloaded from this link: www.winlab.rutgers.edu/~bronzino/downloads/GS2VM_root.zip
Requirements:
- Windows
- Samsung drivers (included in the zip file)
Instructions:
- Install the modified recovery and root the phone following either this guide http://www.rwilco12.com/Files/Devices/Samsung%20Galaxy%20S2%20(Virgin)%20(SPH-D710VMUB)/Tutorials/SPHD710VMUB-Root.php (tested and working) or this guide http://forum.xda-developers.com/showthread.php?p=39800311 (not tested personally). As the first has been tested is recommended.
- Flash (through recovery) the proper file for your build from this page http://forum.xda-developers.com/showthread.php?t=1921045
- Open a shell session on the phone either using terminal emulator or adb
- Type "getprop ril.MSL" and save the 6 numbers code returned
- Open the dialer and type ##3282#
- Select "view → Wimax". When prompted input the MSL previously retrieved.
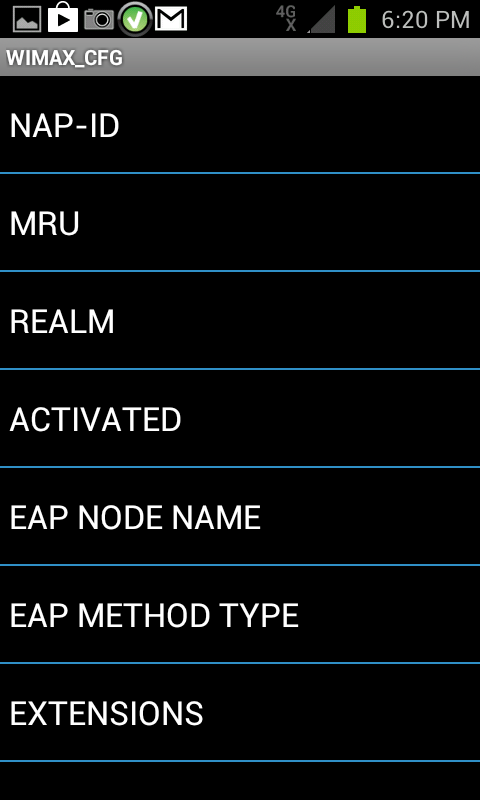
- Select "MRU". Long press the only button available and select the "Edit Mru" option. Change the frequency of channel 1 to 259000.
- Go back and select "NAP-ID". Long press the first line and select "Write Napid". Set it to 4451db
The phone is ready to be connected to the GENI WiMax Base Station
No root method
Requirements:
- Alternative launcher that allows the creation of activities shortcuts such as Nova Launcher (the free version is enough).
Instructions (assuming you have installed Nova Launcher from the market):
- Long press an empty spot in one of your home screens.
- Select "Shortcuts → Activities → WimaxHiddenMenu → WIMAX_CFG" (There are two options for WIMAX_CFG, selects the one with subtitle "napid.Wimax_CFG")
- Open the new icon created in the home screen
- Select "MRU". Long press the only button available and select the "Edit Mru" option. Change the frequency of channel 1 to 259000.
- Go back and select "NAP-ID". Long press the first line and select "Write Napid". Set it to 4451db
The phone is ready to be connected to the GENI WiMax Base Station
Sprint
No root method
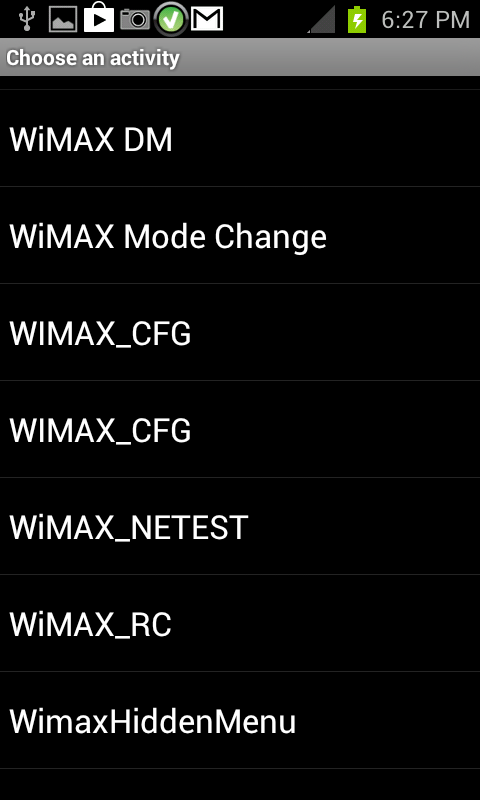
- Install anycut app, to create shortcut to activities. APK is attached to this article.
- Make shortcut to wimaxhiddenmenu
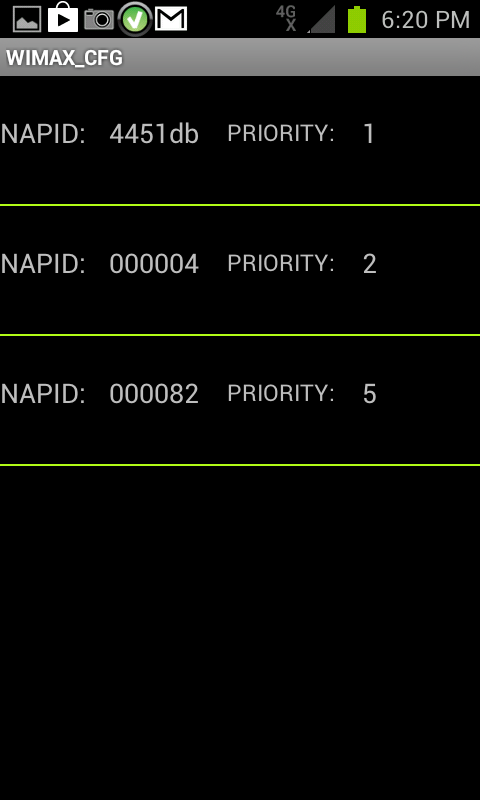
- make shortcut to first entry of wimax_cfg
- in wimax_cfg, set first NAPID to value: 4451db, and priority 1
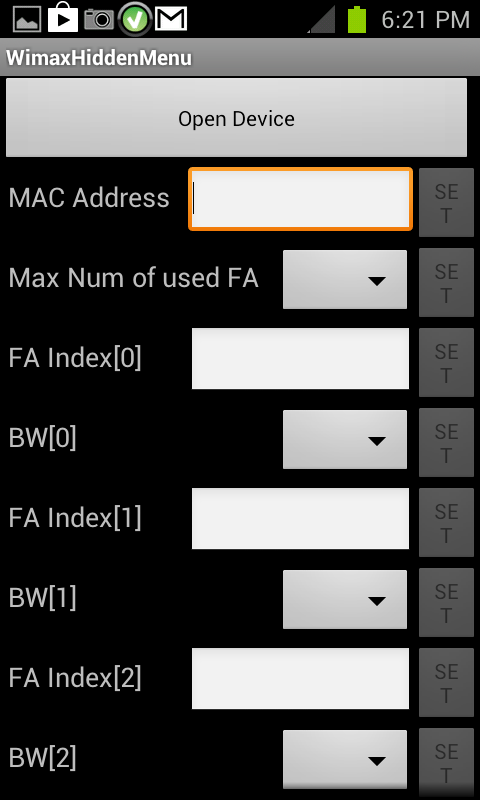
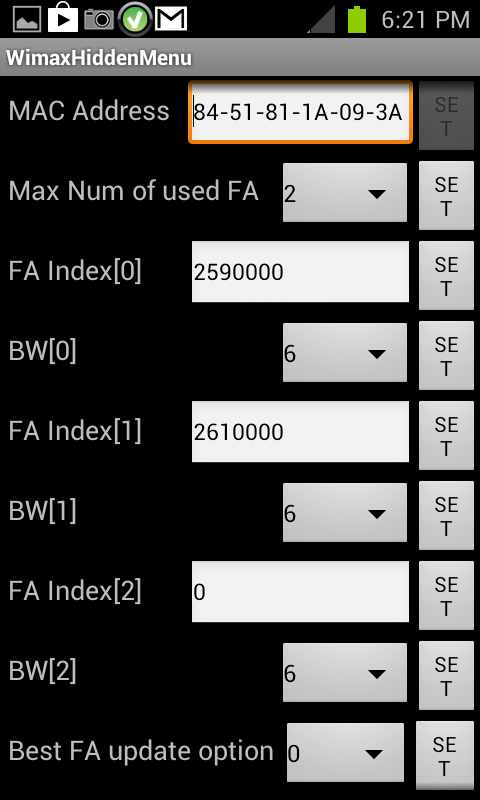
- in wimax hidden menu:
- open device
- FA Index[0]: Set to desired frequency, then press "Set"
- BW[0]: Set to desired Bandwidth, 6→ 10mhz, unsure of values of 5, and 0., then press "Set"
- FA Index[1]: Set to second desired frequency, then press "Set"
- BW[1]: Set to second desired Bandwidth, 6→ 10mhz, unsure of values of 5, and 0., then press "Set"
- FA Index[2]: Set to third desired frequency, then press "Set"
- BW[2]: Set to third desired Bandwidth, 6→ 10mhz, unsure of values of 5, and 0., then press "Set"
- IF FEWER THAN 3 FREQUENCIES DESIRED: follow above instructions, setting extras to 0.
- TO ENSURE THAT ONLY SELECTED FREQUENCIES ARE USED: Set "Best FA update option" to 0. Then press Set.
Attachments (6)
-
com.appdroid.anycut-1.apk
(31.3 KB
) - added by 10 years ago.
APK for anycut android app.
-
activityList.png
(46.9 KB
) - added by 10 years ago.
activityList
-
hiddenmenuempty.png
(58.1 KB
) - added by 10 years ago.
hiddenmenuempty
-
hiddenmenufull.png
(73.0 KB
) - added by 10 years ago.
hiddenmenufull
-
napid.png
(31.5 KB
) - added by 10 years ago.
napid
-
wimax_cfg.png
(35.6 KB
) - added by 10 years ago.
wimax_cfg
Download all attachments as: .zip
Note:
See TracWiki
for help on using the wiki.